Showing posts with label graphic 45. Show all posts

Saturday, August 30, 2014

Enchanting Halloween Tag

Hello! It's Sandie here today, with my final project for August featuring Graphic45's An Eerie Tale 8"x 8" paper pad. If you missed the Paper Bag Album and Halloween Card I made this month you can see them HERE and HERE

Today I am sharing a Halloween tag


The tag is 5.5" long and 3.75" wide and I've covered it with a layer of paper. Then I layered on some black lace and purple ribbon before adhering the sentiment with 3D foam dots. I cut a postage stamp and pumpkin from the papers and also adhered them with 3D foam. The flower is from Prima Marketing's Time Traveler collection


I do hope you have enjoyed my creations from the August kit and I hope to see you all again next month for a brand new showcasing of the September Cardz'n'Scrapz design team kit. 

Sandie
xXx

Tuesday, August 19, 2014

Spooky Houses- art journal page

Hello Arty Souls:)

Halloween is coming and I wanted to show you how can you make fun journal page using beautiful papers by Graphic 45 An Erie Tale
 Just let go your scrapbooking precision and tear the paper:) Have fun!!!


This is so simple: you need to just cut out shapes of the houses and their different details such as windows, doors, roofs and put them together. Just remember to use contrasting colours. Try to play with small details as they always add more magic ;)


At the end I shade the houses with markers and also make some doodles with a pen:)


I hope you enjoyed it!
Happy early Halloween!!!
xx
Sylwia

Sunday, August 17, 2014

Vintage set by Marta

Hello guys,
It's Marta here with my next August inspiration.

I am gonna show you today my vintage set. I created a card and a tag from beautiful Graphic 45 Paper pad 8x8 An Eerie Tale.
I added beautiful paper Prima Flowers.

"Thank you" wording is created on the computer and printed.
I also added some lace from my stash. White doily is made with new die cute from Prima.
The other doily seen is actually fussy cut from Prima Flowers packaging. Often times packaging is as beautiful as actual product in the box.

This tag also contains some packaging. You can easily see it on the top part of the tag. Those small dots are made with my favourite liquid pearls. Wording is from Kaisercraft clear stamp 'Today'.


I hope you liked my vintage creations. I also hope I encouraged you to use some packaging.
Sending you lots of creative hugs,
Marta xx

Friday, August 15, 2014

You Bewitch Me

Good morning! Today I have a card to share, which I created using scraps from the Graphic45 An Eerie Tale 8"x8" paper pad. I have already made an paperbag album from this same paper pad (you can see it here) and was a little too enthusiastic with extra tags and photo matts so I am working with off cuts and strips. However, there is still plenty left to work on some cards with.


All of the layers, with the exception of the black doily are cut from the papers. I added a little bit of orange grosgrain ribbon, diecut bat, a metal charm flossed with baker's twine and some black pearls to embellish. The postage stamps are also from the paper pack. 


Supplies: 
Brown & Kraft cardstock
Black Doily
Black Pearls

Thanks for popping by, have a great day!
Sandie
xXx

Thursday, August 7, 2014

'Smile more' scrapbooking layout by Marta

Hello there ;)

It's Marta here with my first August inspiration for you.
We have received some fun kit ths month. Orange colours and Halloween theme.
Paper used as my base is from Tim Holtz Idea Ology.

You can see some sewing, great way to build up your backround on the page.
The butterflies are embossed with Lindy's embossing powder.


I added string from my stash, it's my recent favourite embellishment. 
Small dots are made with liquid pearls.


Cute music note is from Prima lyric shaped paper metal clips.
Yellow modeling paste was mixed with Lindy's Stamp Gang magicals. These are wonderful powders that could be mix with water, paste etc.


I hope you have enjoyed my work. If you would like to know how to create mixed media page like that here is link to my previous work with video tutorial.

Sending you hugs,

Tuesday, August 5, 2014

Altered frame by Sylwia

Hello Arty Souls!

I am still in a summer mood, summer colours and flowers!!!:) And I wanted to use a print with one of my paintings- a little fairy girl called 'Shine'


Today I wanted to show you my altered frame, which I decorated using August fabulous kit:


Art Supplies I used:
Metal Paper Clips
TandiArt Fairy Girl
Vintage Music Sheet

I created the background with acrylics, oil pastels and I also use embossing powders with stamps.
I added paper flowers, metal paper clip and cheese cloth dyed with ink sprays.


The girl is a print of one of my paintings


I hope you enjoyed the project

Love

Sylwia
xx

Friday, August 1, 2014

It's an Eerie Tale...

Hi! It's Sandie here and I'm back again today with the first project for August. I am sharing a mini album I made featuring the divine Graphic45 An Eerie Tale 8x8 paper pad

The album is made up of  one 6.25" x 12.5" black paper bag and three 5 7/8" x 11.75" brown paper bags. I stitched them together, down the centre, making a 6.25" square album cover with the pages inside being a little smaller. 

On the front I used Enchanted and layered on some pieces I cut from Magic Spell and Fanciful Fable. I also added some small flowers, die cut bats and a Witch Hat charm flossed with bakers twine. 


The inside pages are filled with tags and photo matts. I used buttons to embellish 


I cut the stamp from the Wicked Whimsey paper


On this page I used black cardstock 5.25" x 10" and folded it in half to make a flap, for extra photos inside. I also added some cut outs from You Bewitch Me, which are held onto the belly band with a Key shaped paperclip by Prima. 


Some more tags and postcards for photos or journalling on. 


Again, I fussy cut a pumpkin from the papers and added a metal pumpkin to one of the tags using twine. 


That's it from me for today. Be sure to pop back regularly this month to see what my Teamies have created. 
Thanks for dropping by
Sandie


Wednesday, April 30, 2014

Picture frame - perfect house decoration and gift

Hello, hello ;)

It's Marta here with my special April project.
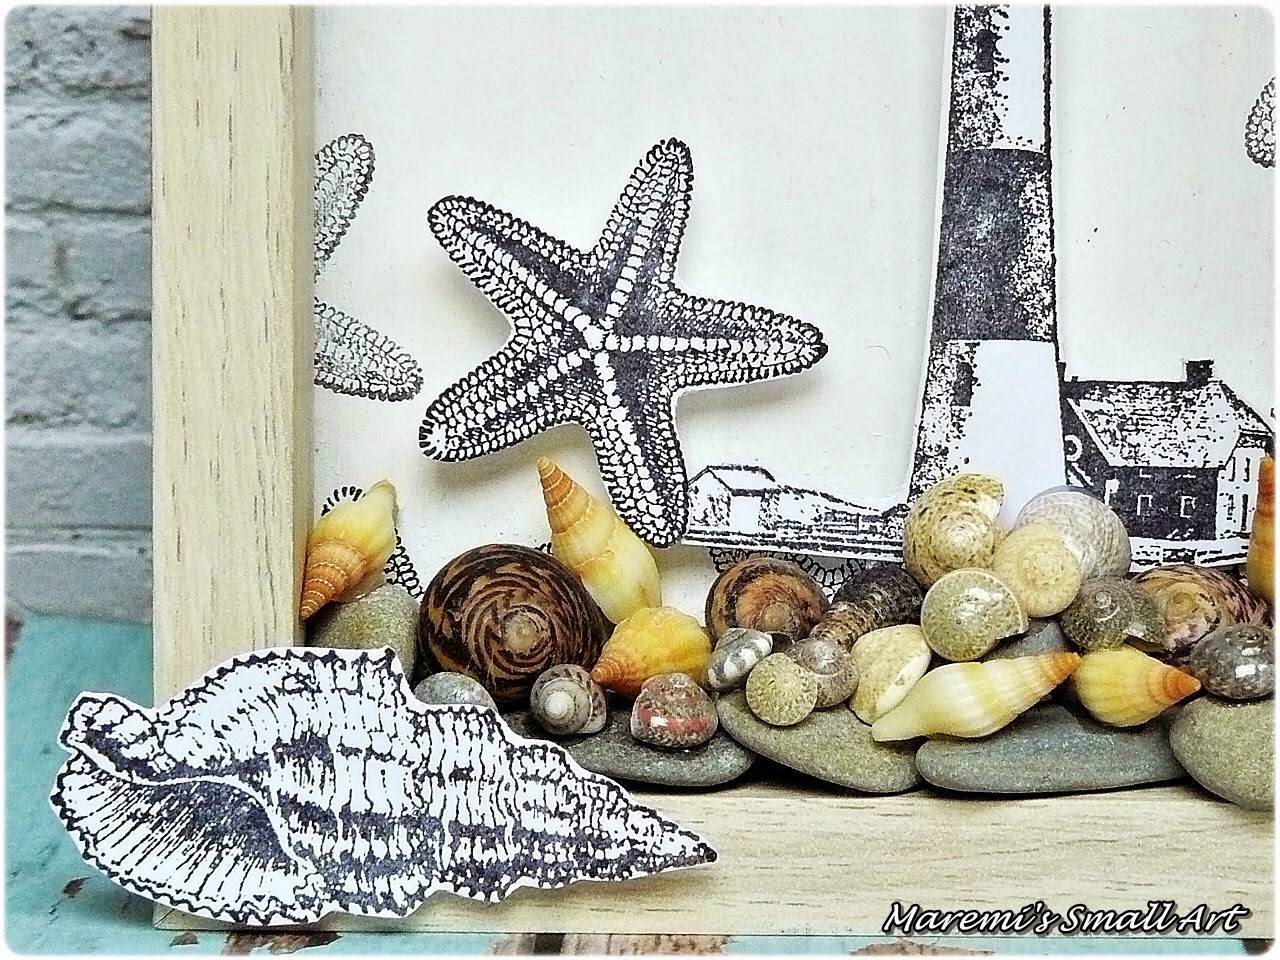
I would love to share with you my picture frame. I wanted to create some work that could be done by everybody and not necessary with craft experience.
This project consists frame, stamped images, shells and stones. Frame can be purchased in every shop, stones are from the beach... Yes, we need those lovely 'The Sea' Graphic 45 stamps and sea shells.


The back of the picture frame was painted with acrylic white paint
I stamped few images on back of the frame. 

 
On the seperate white cardstock I stamped lighthouse, starfish and shell. 
I cut out the images and sticked them with 3D foam squares, this gave some dimentional effect to the project.


Last part was to stick some stones and shells ;)

I hope I encoured you to try and make some picture frame. 
It could make a great gift for our relatives or just for ourselves. 
Handmade decorations are always precious and special.

If you wish to see 2 more of my projects from the April kit
then click here for Seaside Layout or Summery Cards .

It's the last April project from our team.
In the next month it will be also interesting - I can tell you some small senak peak - Tim Holtz and his beautiful papers ! The whole design team is very excited and cannot wait to start sharing their May projects.

Sending you lots love,
Marta x

Graphic 45 - By the Sea - A Trio of Greeting Cards


Good morning! It's Sandie here with my last post using the April design team kit. We featured Graphic 45's By the Sea paper pad, stamps and various other nautical themed products - all listed at the end of the post. 

Today I have 3 cards to share. 
On this first card I used only the papers, some cardstock and a little piece of twine. I layered them up using 3D foam behind the front panel, for a more dimensional card. 


For my second card I added some fish net and a metal shell charm tied onto the twine. I also trimmed out the starfish and shells from the Beachcomber sheet. Again, I used 3D foam behind the front panel. 


On my last card I used the Graphic 45 cling stamps and stamped out the lighthouse using Fired Brick distress ink and Archival black. The Post Card is from the Sand and Surf sheet. To embellish I cut out some of the stamps from Splash and added some shells with hot glue. 


From this paper pad I have created a 5.5" x 4" Mini Album, Altered Frame and 3 Cards and I still have loads left -  definitely one of the best value for money items I've had in a while. 

Products Used:

I hope you've enjoyed the team's showcasing of all the products in this kit - we are looking forward to starting with a brand new kit on May 1st, so make sure to check back. 

Sandie
xXx

Tuesday, April 22, 2014

Summery Cards by Marta

Hello crafty people :)

I am very happy to share with you my three summery cards today.
My todays creations are part of my design team work for Cardz 'n' Scrapz.
We received wonderful products this month. 
Beach, sea and summer are words associated to this products.
All three cards could be a perfect summer, holiday souvenir or wonderful gift for a close relatives.

For my first card I have used lovely image of sea. I sticked some small, 
cute shells into the photograph. 
Behind the photo I attached the fish net. Papers used are from Graphic 45.


In this creation you can find not only papers from Graphic 45 but also 
their beautiful stamps (word sea and seahorse image). 
Whole card is tied with bamboo blue cord.

My third card has some mixed media touches. On the backround I used Tim Holtz stencil and structure paste. I splased the backround with Tattered Angles Mists. On the side I attached great wooden chipboard. Fish net was coloured in black with some ink.

Products used:

Here is few more photos :)


If you would like to see my previous project with April kit then please click here for my Seaside Layout.
I hope you have enjoyed this creative journey with me. 
I will see you soon, hugs
Marta x

Tuesday, April 15, 2014

Altered Papier Mache Frame - By the Sea

Hi guys, it's Sandie here with another project featuring Graphic 45 By the Sea papers and stamps, and some other nautical goodies. 


I started out with a bare papier mache frame and roughly applied a couple of coats of gesso. I wanted to give the frame the texture of lighthouse walls. Once the gesso dried I then I added some white paint, and dried that off quicky with a heat gun. I trimmed down the By The Sea sheet to fit inside the frame. Then I adhered the fish net and shells around the frame. 

I stamped out the lighthouse from the Cling Set 1 and trimmed it out with a scissors. 

I also cut out some stamps and star fish from the papers and tucked a little bit of the net underneath


Thanks for dropping by!
Sandie
xxx