Monday, September 29, 2014

Enchanted Garden Book Box Card

Hi! It's Sandie here today and (sadly) I am sharing my last design team post for Cardz 'n' Scrapz. I have loved being on this team and have enjoyed every moment of working with the rest of the team. Alas, all good things must come to an end :) 

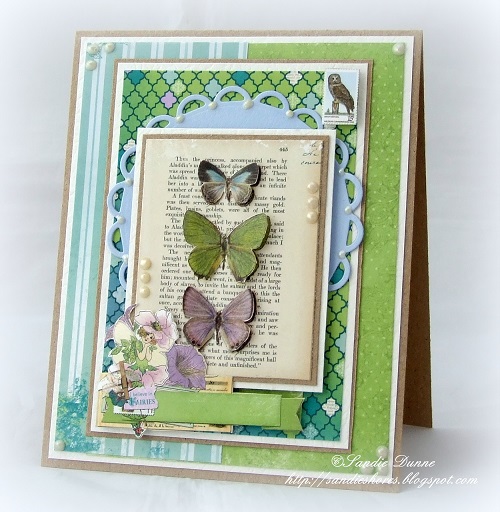
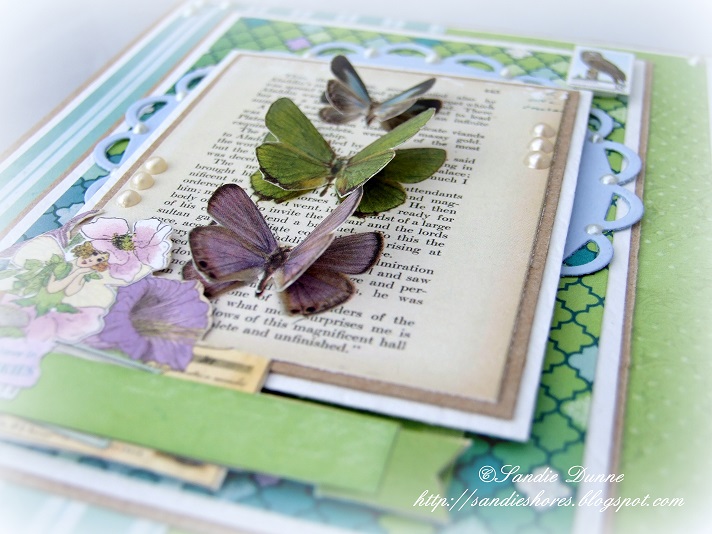
 I made a Book Box Card featuring the Enchanted Garden 6x6 paper pad


Supplies:
Enchanted Garden 6x6 paper pack
Ribbon
Embellishments of choice. 

6" x 10.5" piece of White cardstock for the base
5 7/8" piece of medium turquoise cardstock x 4
5.75" piece of white cardstock x 2
5 5/8" piece of patterned paper x 4

For the  book 'pages'
7.5" x 5.5" pieces of cardstock x 2
7.5" x 4.75" pieces of cardstock x 2

Tools
Adhesives - Wet glue and/or Double Sided Tape


1. Place the 6" x 101/2" piece of cardstock horizontally (landscape orientation) on the scoreboard. Score at 5" and again at 51/2"

2. Fold along the score lines to form an 8" x 5" card with a 1/2" spine. 

Concertina fold (mountain, valley, mountain, valley, etc.) the two 7.5" x 5.5" pieces of cardstock and the two 7.5" x 4.75" pieces of cardstock at 3/4" intervals. (Note that the 7.5" x 4.75" pieces are scored and folded across the short length). 

To assemble the book frame take one of the long pieces and one of the short pieces, weave the folds together and use glue on the top and bottom to hold it in place. Once you have all 4 pieces secured set it aside.You will get a much better fit if your folds are precise and even.

3
4

On the front and back of the Book Box Card I layered up the medium turquoise card, the white card and then the patterned paper. On both sides of the inside I left out the white card panel between the turquoise and patterned paper. 

Note: Add  your ribbon to the front and back of the base before adhering the front and back panels. 
Decorate the box as desired. I used Prima flowers, rhinestones, pearls, Papermania bows and other paper flowers. 

And that is it from me :) 
Thank you so much for dropping by
Sandie
xXx

Friday, September 26, 2014

Mermaid Dreams

Hello lovelies,

I am back today with my last project for the design team with Cardz'n'Scrapz.  It has been an absolute pleasure, I have loved every minute of it, the end of something lovely :)  I have enjoyed sharing my work with you all so much.


For my last project I created a canvas, as it had been a while since I had played with one.   I created a back ground from the lovely Bo Bunny Enchanted Garden papers and played with white gesso and paste with the Prima star stencil by Finnibair.  The kraft dollies made great waves to place at the bottom of the canvas.  Loved how this paper collection allowed me try colours I would never have picked myself.


Lace, mosaic glass stones, wood flourishes, ribbon, and petaloo flowers where used as embellishments.  I also did some random stamping to add dimension with a Prima stamp and my Archival Ink from Ranger.

I hope you like this project.  Sending big goodbye waves to you all.

Hugs Mandyxxx

Wednesday, September 24, 2014

'Perfect Memory' layout by Marta + VIDEO tutorial

Hello there,

It's Marta here today. I am back with new layout for September and video tutorial.
To create this project I used Prima and  Bo Bunny Paper Pad.
To create backround I used Prima stencil and sprays from Lindy's Stamp Gang.

Some beautiful embellishments are flowers from PetalooWood Flourishes Clam Shell
and Petaloo Paper Doilies.


I added some mosaic glass stones and mini shells. As for final touches I added summer chipboards.

Here is a complete step by step tutorial created specially for you.
I hope you will enjoy it :)


Marta xx

Friday, September 19, 2014

Dare to explore - mixed media canvas by Sylwia

Hello Arty Souls!

This is my final project as a DT for Cardz' n' Scrapz. I have to say that it was a big pleasure to be able to create for them with all the beautiful products from the shop. And also to meet other DT members- creative, talented souls!!!! Thank You Cardz'n'Scrapz for this opportunity!

Today I prepared for you a brave project:) I decided to use pastel colours and black feathers!!!
Enjoy!!!

Products I used:


It was a brave project but I like it, because it is important to 'Dare to Explore' new materials and new colours!!!

Thank you for looking at all my projects:)
Feel free to visit my blog:

Love,

Sylwia

Monday, September 15, 2014

Enchanted Garden

Hi! It's Sandie here and today I have a card to share which features Bo Bunny's Enchanted Garden paper collection. 

These papers are amazing and, with a little fussy cutting, you don't need any embellishments. 


The card is 120mm x 148mm kraft base with a 115mm x 143mm white panel. 

The butterflies on the book page is from one of the papers in the pack. I used the same paper again and fussy cut the butterflies, adhering them just along the bodies so that the wings could stand up. I layered a Lacey Circle between the panels. 


I also fussy cut some flowers on the banner and the postage from other papers in the pack.  Finally, I applied some liquid pearls around the card and on the Lacey Circle. 

Products used:

Sandie
xXx

Wednesday, September 10, 2014

' Follow your feelings' by Marta

Hello in September ;)
It's Marta here.
Today I wish to show you my art journal pages. I created my spread in an old book. You can purchase book like that in every second hand store. Pages are old and brownish which I love.
When you will look closer you will be able to see that I have used my book upside down :) I like this kind of effect.
I used images from beautiful paper pad BoBunny (Enchanted Garden).
I sticked the cut outs from the papers and created some sort of composition.

You can also see beautiful Petaloo Paper Doilies. It added extra dimention to the project.
The brown colour around the edges was created with Lindy's Stamp Gang sprays.
I love how this turned out - like an old, rusted image.
Here is more phots as I could not limit myslef to only 2 or 3 as I loooved them all.
Those cute wording are from Cosmo Cricket - tiny text stickers.


Products used:

 Bo Bunny Paper Pad 6X6 36/Pkg Enchanted Garden Petaloo Darjeeling Paper Doilies 7 & 4.5 6/Pkg Craft Brown Lindy's Spray Purple Teal Lindy's Spray Bayou Boogie Gld

I hope you have enjoyed this creation.
My next inspiration will have a video tutorial ! I hope I can see you here again.
Sending you lots creative hugs,
Marta xx

Sunday, September 7, 2014

Mindful Layout

Hello!!!

Hope all of you are well!  Here is my project with the beautiful kit we received for September.

This is a layout of sorts.  It has no picture to it.  I wanted to try something different.  The purpose is that I will place this near my desk and the colours, shapes and embellishments will be a reminder to take a few minutes out and think of something nice.

The base was created with 12x12 paper on cardstock, layered with coarse texture paste using the lovely star stencil by Prima in this months kit. I also added some spraying....always need to spray!

The BoBunny "enchanted garden" papers were cut down into random different sizes and layered over a craft paper dollie which also got the spray effect.  The main feature is one of the empty wooden packaging boxes that hold wooden pieces by Prima.  This was painted and papered.  I added a glittered Kaisercraft wooden shell and some other embellishments.
For finishing touches are Prima flowers and gem stones.  For some added interest I added Distress Glitter to the flowers :)
I hope you enjoyed this project and that is inspires you to have a play with these products.  Take care and see you for my second project for September soon!
Mandyxxx

Friday, September 5, 2014

'You are my fairy'- mixed media canvas by Sylwia

   Hello Arty Souls!

Welcome in September:) Holidays are finished, kids are back at school, so do you have more time for crafting now? Well, for me there is no difference, my little daughter is keeping me very busy ;) However when she goes to bed, its Mummy Time!!!!  I am tired but still have energy to create:)
This time I decided to go back to my favourite art- mixed media on canvas and my precious fairy girls:)

I used following materials:

Acrylics
Stamps


I started with gluing pieces of paper to the canvas. Than I layered some gesso with a stencil.I chose my favourite pieces of paper for the skirt. I outlined  my girl and then I painted rest of the background in pink.


I love turquoise eyes:)


I added flowers to the quilt skirt. I love the combination of green and pink.

 I made the wings out of the paper doilies.


I hope you enjoyed the project :)

Love,
Sylwia

Monday, September 1, 2014

Every Princess...

Hi! It's Sandie here with the first post featuring our September DT kit, and today I am sharing a mixed media canvas. 
I covered a 6x8" slim canvas with Bo Bunny's Enchanted Garden papers and whitewashed them with a layer of watered down gesso. I dried it quickly with my heat gun before adding some butterflies with the Prima Butterflies stencil and modeling paste. I then added a kraft doily and gave the whole canvas another layer of gesso
I then used some spray inks to add colour. 
I drew some hills with a black paint Sharpie and shaded them with Gelatos - adding some little toadstools with a stamp I had in my stash. 
The house is made from card. I covered the bottom piece with tissue paper and drew the door and windows. Then I used gelatos to colour it all. The title is made up from various different stamp sets - Stampendous Small Typewriter clear stampsUrban Stamps Typewriter & Bo Bunny Upper Case wooden stamps.
I added some stars and then applied Emperor's gold Silks to a few of the butterflies, the sentiment and the stars. Finally, I applied some liquid pearls around the canvas. 
Products Used:
Slim Canvas
Bo Bunny - Enchanted Garden 6x6" paper pad
Gesso, Mod Podge, Modeling Paste

Have a fabulous day!!
Sandie
xxx