Showing posts with label Canvas. Show all posts

Monday, September 1, 2014

Every Princess...

Hi! It's Sandie here with the first post featuring our September DT kit, and today I am sharing a mixed media canvas. 
I covered a 6x8" slim canvas with Bo Bunny's Enchanted Garden papers and whitewashed them with a layer of watered down gesso. I dried it quickly with my heat gun before adding some butterflies with the Prima Butterflies stencil and modeling paste. I then added a kraft doily and gave the whole canvas another layer of gesso. 
I then used some spray inks to add colour. 
I drew some hills with a black paint Sharpie and shaded them with Gelatos - adding some little toadstools with a stamp I had in my stash. 
The house is made from card. I covered the bottom piece with tissue paper and drew the door and windows. Then I used gelatos to colour it all. The title is made up from various different stamp sets - Stampendous Small Typewriter clear stamps, Urban Stamps Typewriter & Bo Bunny Upper Case wooden stamps.
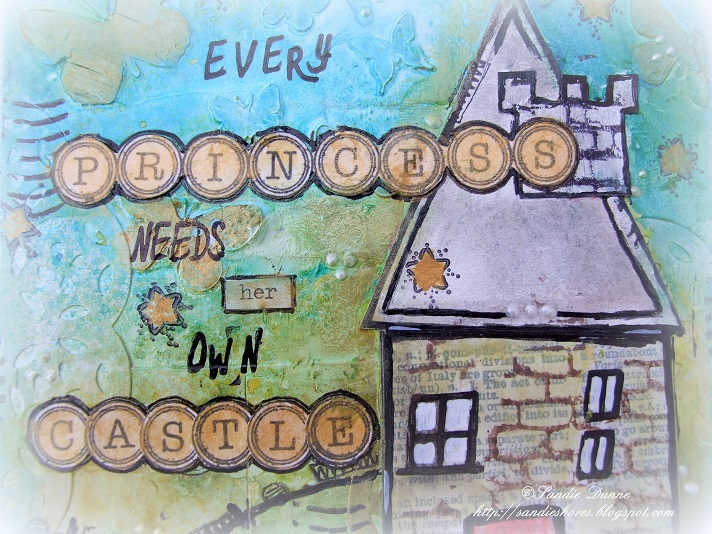
I added some stars and then applied Emperor's gold Silks to a few of the butterflies, the sentiment and the stars. Finally, I applied some liquid pearls around the canvas. 
Products Used:
Slim Canvas
Bo Bunny - Enchanted Garden 6x6" paper pad
Gesso, Mod Podge, Modeling Paste

Have a fabulous day!!
Sandie
xxx

Saturday, July 12, 2014

Tagged Card

Hello lovelies.

Happy July, hope everyone is enjoying their summer!  Today I am sharing my first project for July.  I created a card from our mixed media style kit this month.  I used the Prima tags bound together to create my card base.  I love how these tags allowed me to create a unique card shape.

I covered the front of my first tag with paper by Mod Podge and placed a layer of lace by Websters Pages over the top and sewed into place.  I also added some splashes of the beautiful  Luminarte Silks, vibrant paints & Lindy's Stamp Gang Starburst.


The centre of the card has a journalling notecard by Prima, with lace added to the edges along with some ruffled trim by Papermania.

I added a banner from Autentique paper line in music notes.  The centre piece of my tag is the chipboard flourish from last months kit painted in Antik metallic liquid and silks.  I stamped the dress form stamp from Deep Red on patterned paper, cut out and layerd over chipboard.  for finishing touches to this I added some Prima resist canvas.  The top of card is created with wooden dolls wooden bunting also by Prima.  All finished with a sentiment epoxy sticker from Heidi Swapp.


Thanks for popping by, loves Mandyxxx

Monday, June 30, 2014

Small mixed media canvas

Hello Arty Souls,
This is my little extra project for June. Sometimes I create those little canvas to add to the gift instead of the card. It takes no time to make them and they are nice personal touch to the present.

I used the fabulous June kit from Cardz'n'Scrapz and following art supplies:

Acrylic paint Lagoon 
paper flowers
5x5 canvas
stamps

I started by gluing random pieces of Create Paper Pad. Than I added some paint and doodles. I also use stamp to add more texture. When I use stamps, I never go for a perfect picture, I just stamp randomly using half of the stamp. When my background was finished I added paper doily and chipboard clock.


I also added some paper flowers


I hope you enjoed the project.

See you in July!!!

Love,

Sylwia

Saturday, February 15, 2014

Make a Notice Board - 2nd Project using February DT Kit - Joanne

Hi There - Joanne here again showing you how to make a Notice Board with a plain canvas and paper !

I have a weakness for Notice Boards - I just love them especially ones that are full of colour and texture - mixed with photos and memorabilia ! While I have seen many of them made with fabric - I decided to make mine with paper !


First I bought a plain canvas 30" x 20" - then I painted it with Gesso as I needed to stamp on it. Next I got two sheets of KaiserCraft Paper (Art of Life Collection) - cut them into pieces, distressed the sides of them and stuck them randomly onto the canvas - honestly it is so easy and so much fun !


I stamped some extra images onto the papers (Tim Holtz stamps) and then stamped the gaps using my KaiserCraft stamp (Rocks).  I loved this stamp so much - I bought the full range - they are amazing value !!!


Next I used all my Ranger Distress Inks - combining them in different ways - and because they work so well together - its impossible to make a mistake !


During the next stage I went though all my chipboard embellishments - bits of paper - prima flowers, Tim Holtz elements and just stuck them all down.


And finally I dyed some plain elastic with Glimmer Mist - sprayed onto a baby wipe - and stapled it onto the back of the canvas.  Added a few more elements - and there it is !!!  Can't wait to put it up and start adding to it !  So why not give it a try - you will be thrilled with the results !!


Thanks a million for looking .....Enjoy !

Joanne x
Design Team

Materials Used:

KaiserCraft Paper - Art of Life Collection 12 x 12;
Chipboard - Wycinanka - Photo film, Fullness of Summer;
Tim Holtz - Ideology Collection;
Ranger Distress Inks - Vintage photo, Black Soot, Firebrick, Broken China, Mustard Seed, Peeled Paint, Spiced Marmalade;
Petaloo Butterfly
Glimmer Mist - Tattered Leather
Prima Flowers - Light Grey Flowers - Brown Flowers;
Chipboard buttons
KaiserCraft Stamps (Rocks) and Tim Holtz stamps;
Plain white elastic
Scraps of paper
Canvas - 30" x 20";


Thursday, January 23, 2014

Gelatos and new chipboard canvas

Hi guys :)
Today I want to show you a 8x8"canvas. First I glued some paper strips, some fiber trim and tissue tape, than I used Prima "Lattice" stencil with light modelling paste to create textured background. Next I glued some new chipboard (I just love Steampunk one!) and covered everything with thick layer of gesso. I used Gelatos only to colour my canvas 
Then I added in Prima Giselle flower, Prima bulbs, faucet wheels, epoxy dots, white feather and seam binding ribbon.


Hope you like it ;)


Monday, January 20, 2014

Aideens second gelato project for January!

Hey guys! Aideen back again with another fun gelato project and also some ideas for using your gelatos :)


Here is what I have made:


It's a fun mixed media canvas board where I used some nice techniques with the gelatos-of course I have a video to show you exactly how I made it :) so please check it out and let me know what you think!!


Have you tried out gelatos yet?? Share your makes with us by linking your blog in the comments,

Thanks for visiting,

Aideen x

Sunday, January 12, 2014

Joanne's DT 2nd Project for January 2014

Hi there - Joanne here again !

This is my final project made with the kit that was sent out for January.  I decided to create a LO / mixed media canvas that would sit on my desk for the year ahead so I used a small 6 x 6 canvas I had bought from Cork Art Supplies.

 Rather than stamping directly onto the canvas - I decided to stamp onto a sheet of watercolour paper first of all - using the new Kaisercraft Clear Stamps (Rocks) . I then distress it using different Ranger distress inks.

 I then stuck it down onto the canvas and started to place my embellishment on it using brads to keep some of the bigger elements firmly on and Gel Medium for the rest of them. I then added in a photo using a Tim Holtz clip and the reason I did this is so that you change the photo when you want, creating a very different look each time.


New photo !  Finally I stuck the canvas onto a small stand and there it is - all finished !  Doesn't the 'rock' stamp in the background make it - and up close it looks even better !


Just before I sign off - just thought I would make a quick 'scrappy' card using the Kaisercraft  'Rock' stamp as the background.  So I simply stamped it, stuck on a few bits of paper and washi tape I had on my table and seriously it turned out so lovely - I even did the envelope !

Thank you all so much for looking - hope this inspires you to get crafty !!! Enjoy !!!!

Materials used:
Kaisercraft - Clear Stamps - Rocks
Junkyard Findings - Prima Marketing
Mini Vintage Alphabet - Bottle Cap inc;
Small Epoxy Dots - Bottle Cap inc;
Prima Mechanical Roses and brads;
Selection of Prima Flowers
Prima Wooden Elements
Ranger Distress Inks - Peeled Paint, Spiced Marmalade, Fired Brick, Vintage photo;
Ranger Archival Ink - Black
Canvas - 6 x 6
Plain Card, washi tape, buttons, SNAP paper; Gel Medium;


Joanne x 

Friday, January 10, 2014

Joanne's Mixed Media Canvas using GELATOS !

My DT Project for January using Gelatos !

This has to be one of the best products on the market at the moment - just loved them ! 

As this was my first time working with Gelatos by Design Memory Craft (Faber Castell) I spent a few nights looking up You Tube figuring out exactly how best to use them !  And thankfully there is tons of information on their use and so I tried to put into practice as many techniques I could for this project.

First of all I covered a canvas in Gesso.  The big word with gelatos I discovered is RESISTANCE !  


The next step was to rub the gelatos onto the top of the canvas - spray water over them and because the Gesso offers resistance - the gelatos simply dilute and pour down the canvas beautifully - rather than absorbing into it and appearing like blobs of colour. I sprinkled it with salt to give it more dimension and texture.  (If you want to see the difference of using and not using Gesso - check out Donna Downey's videos on them over on You Tube).


Next I found old thick canvas that I had lying around - cut out three feathers and five circles and covered them in Gesso.  I sewed onto them to give them more depth and texture. Then I layered them with different coloured gelatos, sprayed them with water  and blended the colours together with my fingers. Great fun !


Then I added more gelatos to my background so the that my feathers and circles would blend in before sticking them onto the canvas.  I drew in a series of circles with a graphite pencil and sewed a few crosses onto them.  (Don't forget to distress the sides of the circles and feathers in black ink - so that they pop off the canvas).   I then added in some clear epoxy dots to again give it more interest. 


Next I added in the word CHANGE (using Bottle Cap Alphabet mini's) - which is my word for the year.  And added in the description - 'a chance to make a change' in small letters. 


And finally here is the finished project !  And I can't get over how stunning the colours are - they seem to jump out at you !


Materials Used :

Gelatos Green and Tropical Sets - Design Memory Craft (Faber Castell);
Archival Black Ink - Ranger;
Bottle Cap Alphabet Mini's -
Cosmo Cricket - mini letters;
Vintage Collection Epoxy Dots;
Gesso;
Heavy Cream Canvas;
Canvas - 12 " x 18";
Black thread with sewing machine;


Hope you enjoyed this project - as much as I did making it !

Many thanks for looking !

Joanne x